Add Google Sign In to Flutter using Firebase
Let's learn how to add google sign-in to your flutter multiplatform project.
Flutter is a Google's UI Toolkit for Crossplatform Application Development. As of now, there is no single package to add Google oAuth to your Flutter Application. In this blog, we will see how we set up Google Authentication in our Padasalai app for Android, iOS, Web, Windows, and macOS.
Firebase Project Setup.
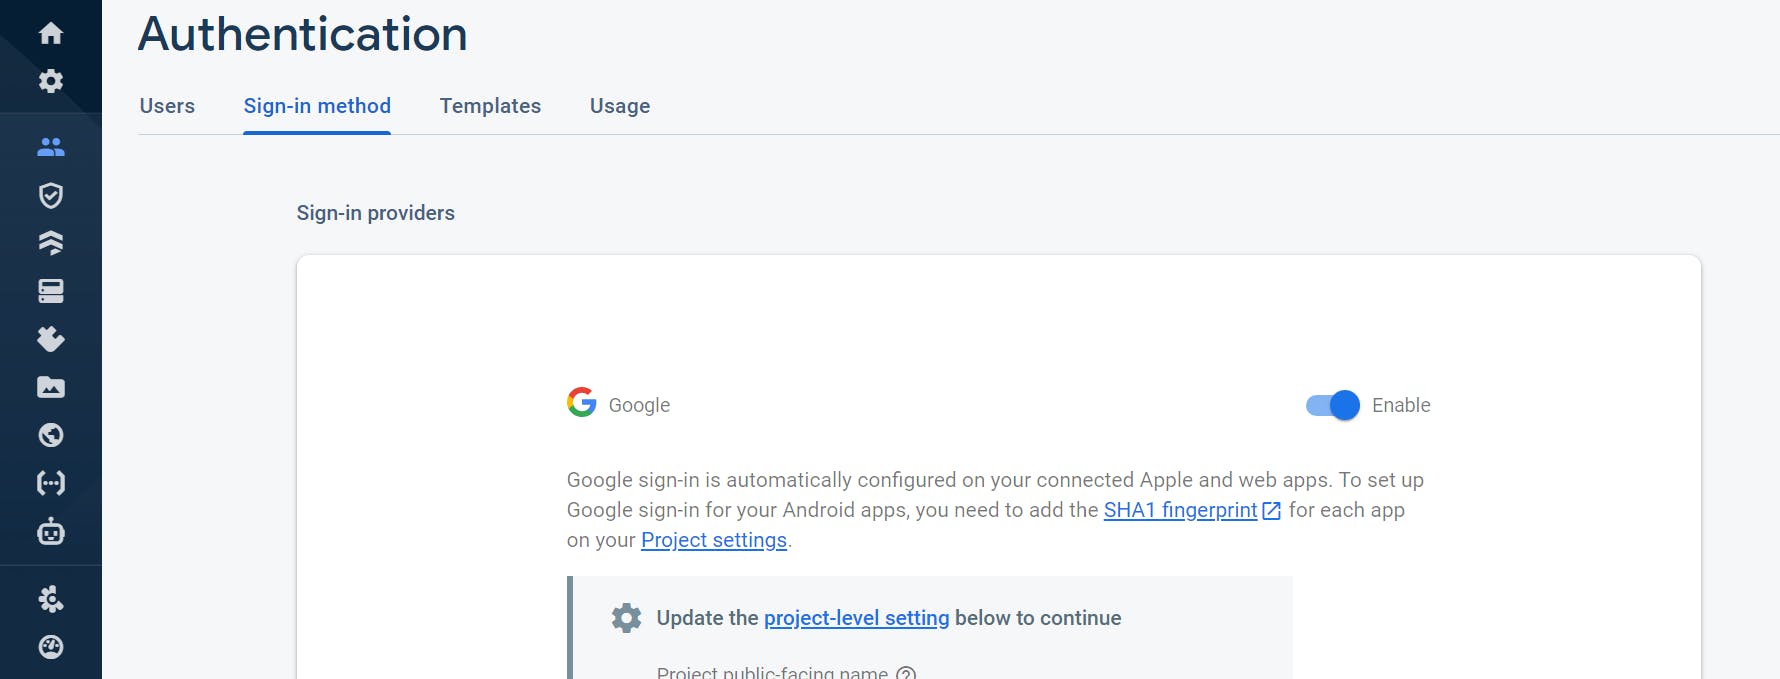
The first step is to enable Google Authentication in your Firebase Console. Go to the sign-in method section of authentication. Here enable Google as a sign-in provider.

Also, you may need to add a Redirect URL and get Google sign-in Client ID in your Google Cloud project.
- Go to the Google Cloud Platform Console and select your project
- Go to APIs & Service -> Credentials
- Create new credentials for your app by selecting CREATE CREDENTIALS and then OAuth client ID
- Select Other as the Application type, give it a name (eg. Desktop), and then click Create.
Flutter Project Setup
Configure Firebase in Project
Configuring Firebase is much easier with the help of flutterfire_cli in Flutter.
For iOS and macOS go to their respective folders root-project\ios\Runner\Info.plist and add following configurations.
<key>CFBundleURLTypes</key>
<array>
    <dict>
        <key>CFBundleTypeRole</key>
        <string>Editor</string>
        <key>CFBundleURLSchemes</key>
        <array>
            <string>#REVERSED_CLIENT_ID</string>
        </array>
    </dict>
</array>
Here #REVERSED_CLIENT_ID can be gotten from the GoogleService-Info.plist file.
For macOS, We need to add extra network configuration things in macOS\Runner\DebugProfile.entitlements and Release.entitlements.
    <key>com.apple.security.network.client</key>
    <true/>
    <key>com.apple.security.network.server</key>
    <true/>
Install Packages.
Now we need to add the following packages in pubspec.yaml. These packages are required to add google sign-in in our app.
  desktop_webview_auth: ^0.0.9
  firebase_auth: ^3.6.4
  firebase_auth_desktop: ^1.0.2
  firebase_core: ^1.21.0
  firebase_core_desktop: ^1.0.2
  google_sign_in: ^5.4.1
  google_sign_in_dartio: ^0.2.1
Oh Yeah! that's a lot. Here firebase_auth_desktop, firebase_core_desktop, desktop_webview_auth,
google_sign_in_dartio these all are desktop specific packages.
Setup Google Sign In client ID.
Since Firebase doesn't support desktop apps right now, we need to use GoogleSignInDart to register the Google clients.
if (!kIsWeb && (Platform.isWindows || Platform.isMacOS)) {
      await GoogleSignInDart.register(
        clientId: #YOUR_GOOGLE_CLIENT_ID,
      );
}
We checked that is it not web before calling Platform to prevent an Unimplemented error.
Initialize Firebase.
Now firebase initialize it in the main function.
  await Firebase.initializeApp(
    options: DefaultFirebaseOptions.currentPlatform,
  );
Auth Service
To handle the authentication logic, let's Create a class called Auth Service. In that create an instance of both FirebaseAuth and GoogleSignIn.
class AuthServices {

  final FirebaseAuth firebaseAuth = FirebaseAuth.instance;

  final GoogleSignIn googleSignIn = GoogleSignIn();

}
Sign In
We need to handle Sign In in different methods for each platform. For the web, we are going to use the signInWithPopup method. In this method, it will create a Pop-up window for Google Sign In.
      GoogleAuthProvider authProvider = GoogleAuthProvider();
      await firebaseAuth.signInWithPopup(authProvider);
For Windows and macOS, we are going to use the signIn method provided by DesktopWebviewAuth. This is similar to the web but the Webview container will be created inside our app. In Windows, The Desktop WebView plugin uses the Edge WebView2 to generate a WebView window.
      final authResult= await DesktopWebviewAuth.signIn(
        GoogleSignInArgs(
          clientId: #YOUR_GOOGLE_CLIENT_ID,
          redirectUri: #YOUR_REDIRECT_URL,
          scope: signInScope,
        ),
      );

      /// Create a new Google Auth Credential
      final credential = GoogleAuthProvider.credential(
        idToken: authResult?.idToken,
        accessToken: authResult?.accessToken,
      );

      /// Sign in with google auth credential.
      await firebaseAuth.signInWithCredential(credential);
Here signInScope is https://www.googleapis.com/auth/userinfo.email to get the user's email address detail. Most of the time the redirect URL will be https://#YOUR_PROJECT_ID.firebaseapp.com/__/auth/handler (You may need to set this up in Google Cloud Console).
Now for mobiles. We don't need to configure anything special for android apps. However please make sure google-services.json for android and GoogleService-Info.plist for Apple platforms are present. If not download the google-services.json configuration file for Android from the Firebase console and place it in project-root\android\app. For Apple platforms, it's recommended to not configure manually. Just download GoogleService-Info.plist from the Firebase console. Open the iOS and macOS directory of the Flutter project in Xcode. In the left side panel right click on the Runner directory then Add Files to Runner and select the respective plist file.
    final GoogleSignInAccount? googleAcc = await _googleSignIn.signIn();
    final GoogleSignInAuthentication googleAuth =
        await googleAcc!.authentication;

    final credential = GoogleAuthProvider.credential(
      accessToken: googleAuth.accessToken,
      idToken: googleAuth.idToken,
    );

    await firebaseAuth.signInWithCredential(await credential);
Sign Out
Now let's go to the sign-out part. It's very simple you all just need to do is calling the signOut method in Google Sign In instance and Firebase Auth instance.
    await googleSignIn.signOut();
    await firebaseAuth.signOut();
Here is the Whole Auth Service class
import 'dart:async';
import 'dart:io';

import 'package:desktop_webview_auth/desktop_webview_auth.dart';
import 'package:desktop_webview_auth/google.dart';
import 'package:firebase_auth/firebase_auth.dart';
import 'package:flutter/foundation.dart';
import 'package:google_sign_in/google_sign_in.dart';

class AuthServices {

  final FirebaseAuth firebaseAuth = FirebaseAuth.instance;

  final GoogleSignIn googleSignIn = GoogleSignIn();

  Future<User?> signInWithGoogle() async {

    late UserCredential userCredential;

    if (kIsWeb) {
      GoogleAuthProvider authProvider = GoogleAuthProvider();
      userCredential = await firebaseAuth.signInWithPopup(authProvider);
    } else if (Platform.isWindows || Platform.isMacOS) {
      final authResult = await DesktopWebviewAuth.signIn(
        GoogleSignInArgs(
          clientId: googleClientId,
          redirectUri: redirectUrl,
          scope: signInScope,
        ),
      );
      /// Create a new Google Auth Credential
      final credential = GoogleAuthProvider.credential(
        idToken: authResult?.idToken,
        accessToken: authResult?.accessToken,
      );
      /// Sign in with google auth credential.
      userCredential = await firebaseAuth.signInWithCredential(credential);
    } else {
      userCredential =
          await firebaseAuth.signInWithCredential(await getAuthCredential());
    }
    return userCredential.user;
  }

  Future<AuthCredential> getAuthCredential() async {
    final GoogleSignInAccount? googleAcc = await googleSignIn.signIn();
    final GoogleSignInAuthentication googleAuth =
        await googleAcc!.authentication;

    final credential = GoogleAuthProvider.credential(
      accessToken: googleAuth.accessToken,
      idToken: googleAuth.idToken,
    );

    return credential;
  }

  Future<void> signOut() async {
    await googleSignIn.signOut();
    await firebaseAuth.signOut();
  }

}
Now you can call this from your button's onPressed() method
AuthService().signInWithGoogle().then((user) {

    if (user != null) {
      // Process to next step.
    } else {
      // Handle Sign In Failure
    }

}
P.s. Make sure you added your machine debug SHA fingerprint in the Firebase console to prevent sign-in call rejections.
That's it. Easy Peasy.
Who we are
RedLeaf Softs Pvt. Ltd. is an IT Company Based in Thoothukudi. We provide Mobile application development and cross-platform development services.
Learn More about us.
Get 15 minutes Free Consultation on how to get your idea to Real World.
